
|
4/2/2021 0 Comments Finishing UpConcluding our project, we attended the Mechatronics Symposium that was held virtually for our Class of 2021. Each group had the opportunity to present their projects to attendees for 20 minutes. As for our group, it went very well: a lot of people attended ours and had a lot of questions for us. People thought our project was particularly cool and very related to everything we have been studying in our program. Take a look at our final project here (scroll down to Group 41)! We also created a marketing video on YouTube which can be found here.
As a group, we're really proud of what we were able to accomplish despite all the setbacks as a result of the pandemic. We were able to develop a fully functional robotic delivery system that met all the constraints and criteria of the project. In addition, it seemed many people enjoyed seeing our project and was interested in the technology behind it. As we finish up our FYDP, we are working on the last remaining deliverables for the course, that being our final report and formal demonstration video.
0 Comments
3/26/2021 0 Comments Successful Delivery!We spent this week tuning some parameters to optimize some of our movements, namely that of adjusting our gait to be able to handle larger packages. Then we put it to the test: we strapped a full size MacBook Pro 2020 box onto it to deliver to a customer (group member in this case). With its payload onboard, the robot was able to successfully deliver the package whilst traversing concrete, grass, and hills. 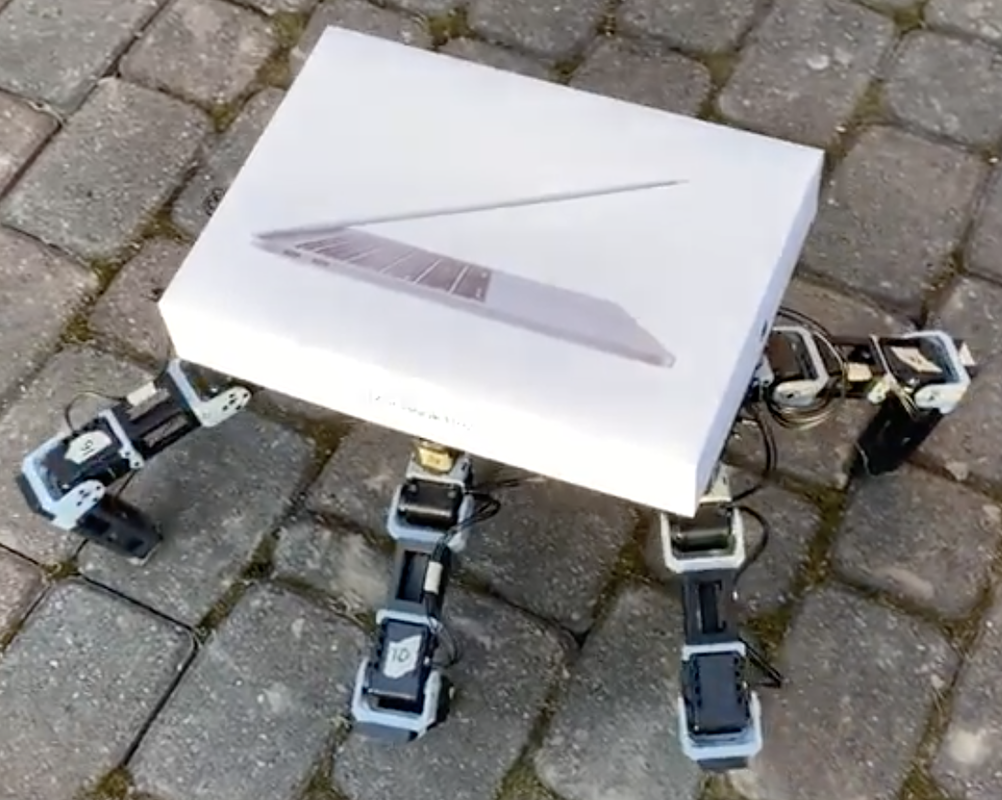 We also performed another test, this time with the payload being a full can of Nestea. We started the robot at the top of a steep ramp to emulate some of the difficult terrain it would have to traverse in its intended environment. As expected, it was able to traverse the ramp, perform a turn/tilt movement, walk up to the customer, and deliver the drink. 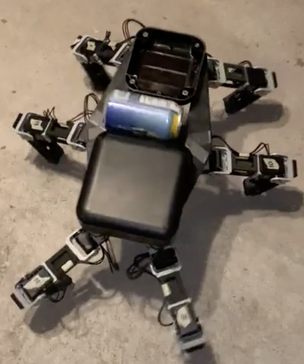 This was the last goal we wanted to meet, and we're super thrilled with our results. Now we're hard at work at finishing up the various deliverables that are due this week, namely that of our marketing video and group project poster. Our marketing video will showoff the various features and capabilities that our robot has including its many movement techniques (walking, turning, strafing, tilting) and abilities (stairs traversal, package delivery). Our group poster will contain a summary of our motivation behind the project, our final solution, and its build (mechanical design, motor control hardware, sensor implementation, and navigation/motion control software).
3/19/2021 0 Comments Time for ActionWe've completed the programming side of things and are finally ready to run the robot! Since last week, we've implemented the battery so that it can now run all on its own without the need for external power. We've also integrated the casing for the electronics as well as a box for the payload, to protect it from the environment: 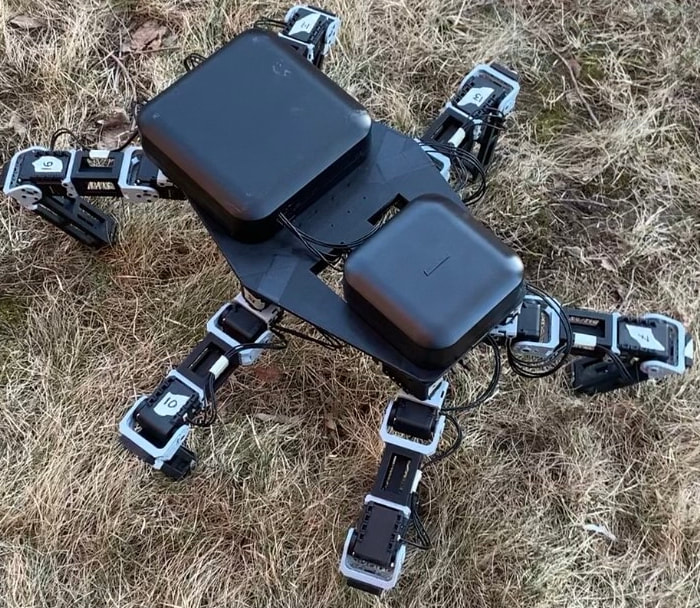 As you can see from above, we've cleaned up the electronics and wiring to give the robot a cleaner and more robust look. Now that the controls code is complete, we can perform all the desired movements such as forward and backward motion, strafing, turning, and tilting. Furthermore, we can traverse a wide range of terrains such as grass, concrete, and hills. One of our major goals was to navigate a set of stairs: 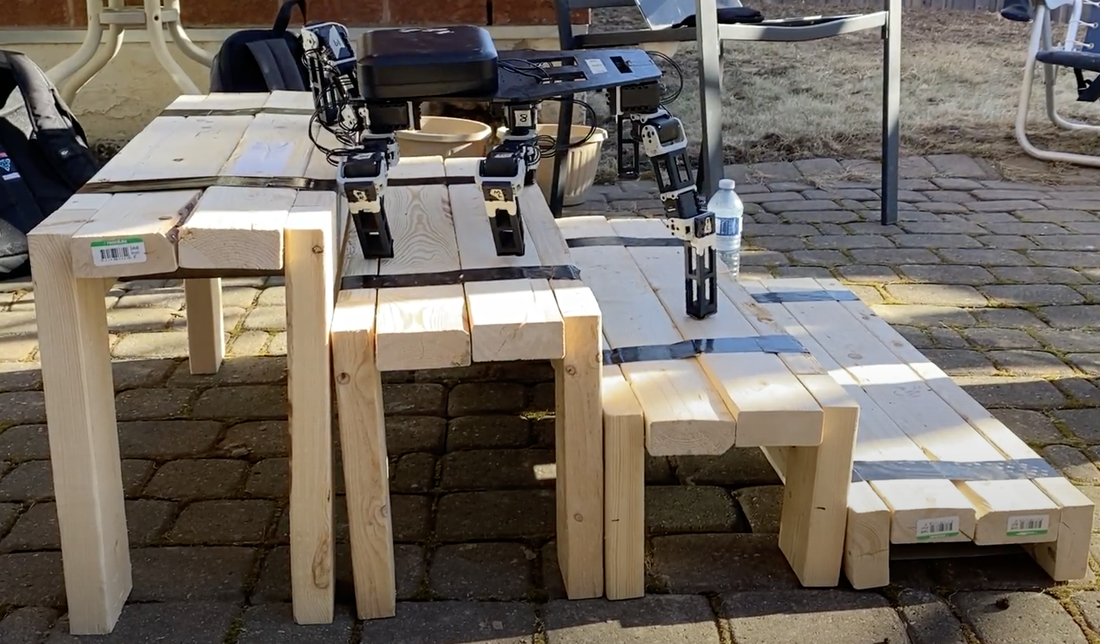 As you can see, we were able to successfully traverse this set of stairs that we constructed for the robot. It combines its various movement capabilities, namely that of forward movement, tilting, and slight turning, to climb the steps with ease. Overall, we're very happy with our progress as we begin to wrap up the project. Next week, we hope to fulfill our final objective, which is to successfully deliver a sample payload to a customer.
3/12/2021 0 Comments We Have Life!After many long nights of work, we finally got it to move! Using a standard gaming controller, we were able to send commands from it to the robot, where the left joystick corresponds to forward, backward, and lateral movement, and the right joystick corresponds to turning. Furthermore, the directional buttons are programmed to allow the robot to tilt in various directions, which gives it the necessary movement to be able to traverse more complex terrain. The motions are fluid and easily moveable with the controller. I would include videos of its movement but we're still fine-tuning it and getting it ready for the final evaluation. Videos of it in motion will be provided in our demonstration videos and on symposium day. We're really proud of the progress we've made so far despite all the issues we faced related to the pandemic and shipping delays. For next week, we will continue to work on the controller, as well as finish up the last few deliverables we have left for electrical. 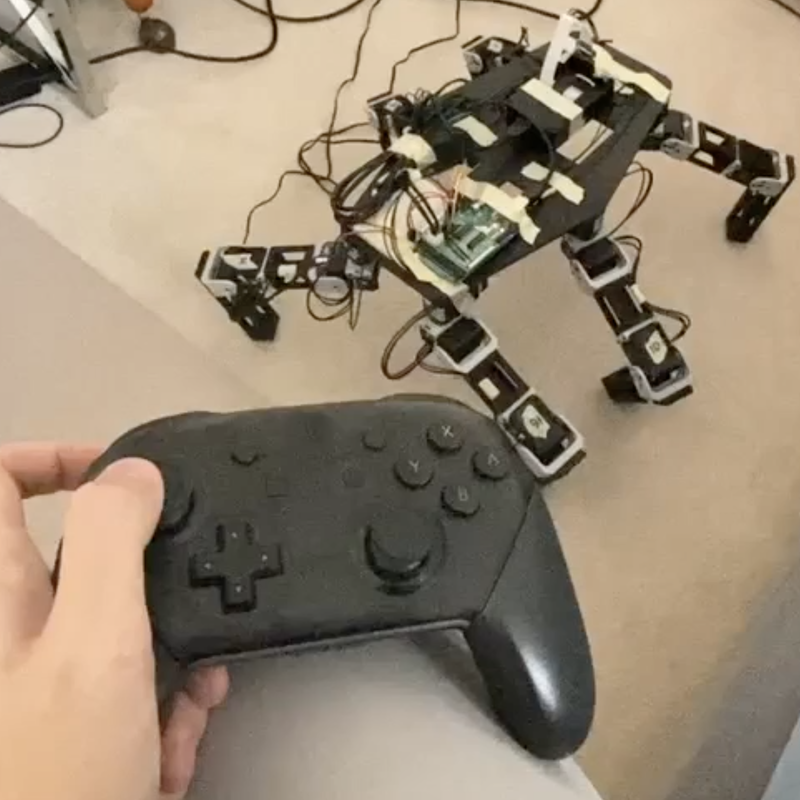 3/5/2021 0 Comments Various UpdatesWe started to work on the electrical side of things, namely putting together our perfboard for the robot. It's currently in the works and we'll provide an update once it's completed. Here's an early image of our progress so far (still more to go): 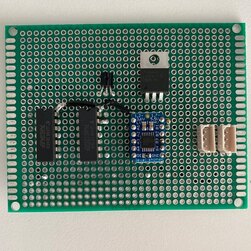 Next, we designed a set of stairs for our robot to traverse for the upcoming demo. To put some measurements out there, the stairs are 32 inches wide and 4 inches tall for each step. Since our original plan was to build a full scale model capable of traversing normal sized steps, now that we have scaled down our prototype, we also scaled down the steps. Stairs are commonly known to be 7 inches tall for each step, so we determined scaling it down to 4 inches for our robot is reasonable: 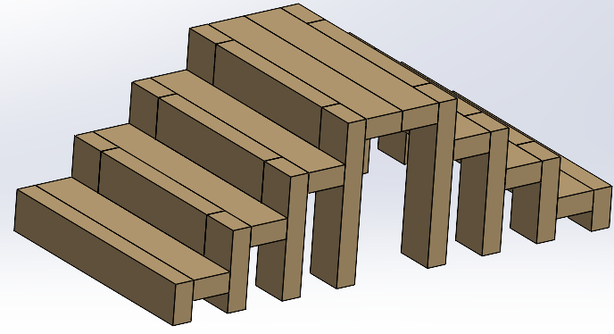 Lastly, we started wiring up some of the components together on our robot. In particular, we wired up our motors on its legs to our main controller on the chassis. Also, we began working on the controls side of things, since we now have most of the mechanical and electrical components integrated together. We were able to successfully control the motors with our controller, early signs of life for our robot. Here is an updated image of our robot, with its "son" as its payload: 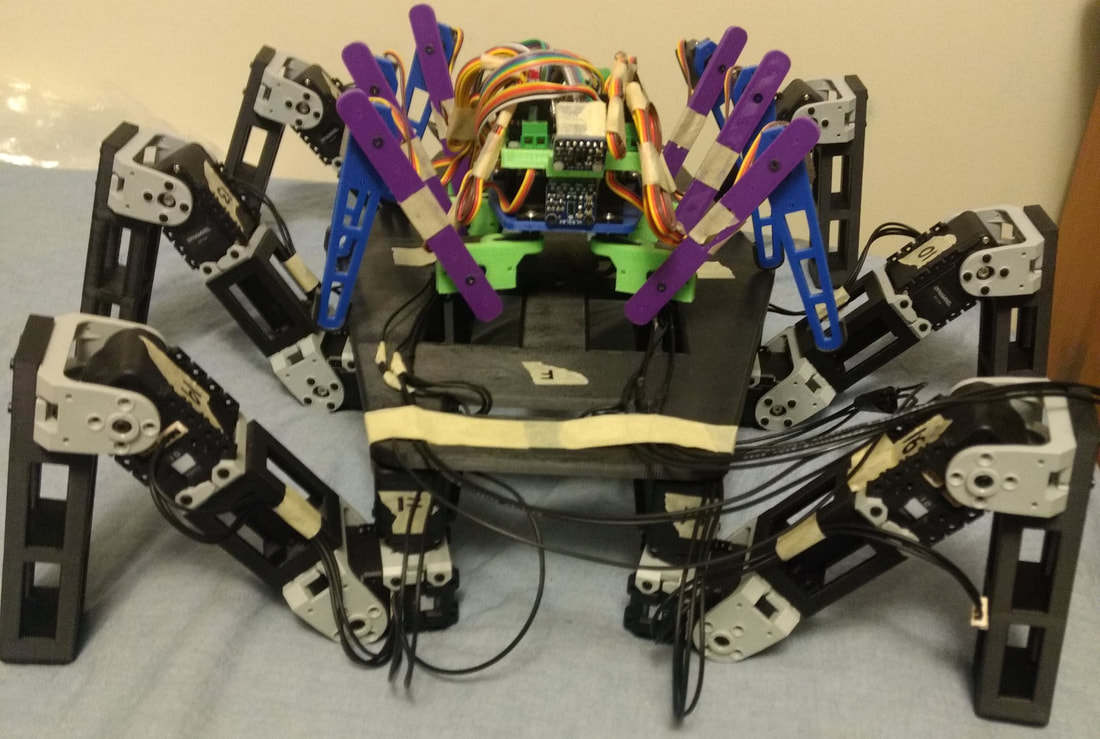 We have a progress demo coming up next week and we're working to get our robot ready for that. We're looking to finish up the electrical work as soon as we can, as well as start to dive deep into the controls programming of the robot. Once this is done, the only deliverables left for the robot are to implement the motion planning and the battery.
2/26/2021 0 Comments Playing Around With the MotorsThis week we began our journey in electrical, namely interacting with the motor. We took apart the legs and experimented with a motor. We hooked it up to a breadboard and wired it to an Arduino to test its movement. Here is a quick look at our motor experimenting setup: 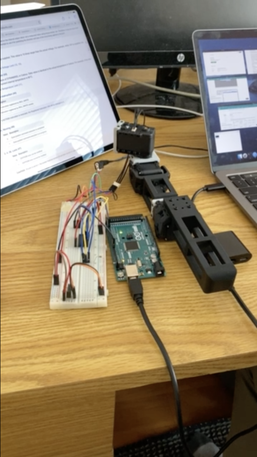 We were able to get the motor to move at desired movements, so this is a good sign for us. Our next plan is to order the remaining electrical parts we need, and then put it all together. In the meantime, we're beginning some of the software and controls work, as our demo day is fast approaching. Some of the tasks we need to work on: porting over the motor library code, getting the camera to work, and then starting the motion planning software. One of our goals for the demo is to show the camera output working. More specifically, our plan for next week:
1. Setup the development environment for the Raspberry Pi 2. Develop the controller and camera streaming to the PC 3. Port the motor library to the Raspberry Pi We hope to complete these 3 tasks before we begin the motion planning code. We'll provide an update next week! 2/19/2021 0 Comments Wrapping Up MechanicalWe're excited to share the progress we've made this week as we're beginning to wrap up the mechanical portion of our robot. With all the components now in hand, we started with building up each leg by putting together the 3D printed parts with the motors: 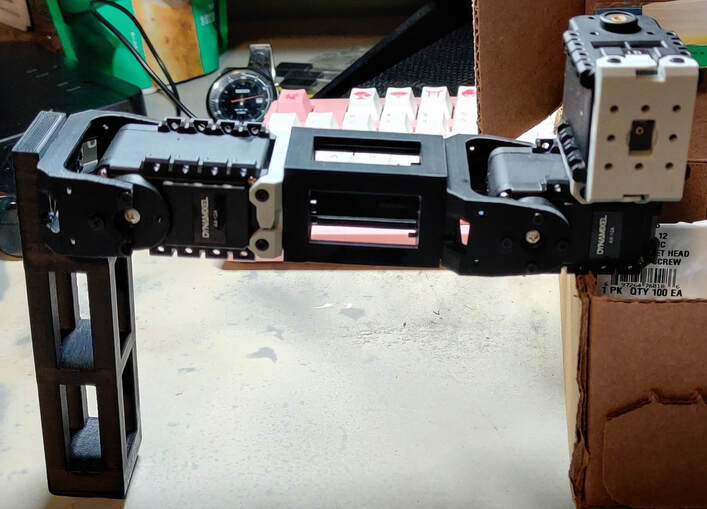 We constructed this build for all six legs, and brought them together with the chassis of the robot. This resulted in a first initial look at what our robot will look like. Since our intention is for delivery, we added a sample payload (i.e., a plant) to show how its delivery items would be positioned. Of course, we still have to integrate the electrical components, but this is just a taste of what's to come: As you can see, all six legs are now situated at the bottom of each corner of our hexagonal chassis. In the chassis are several cutouts which will house the electrical components and manage the wiring between the controller, various sensors, power supply, and motors. Later on, the goal is to add a casing which will house the payload and keep it safe from the robot's components and outside environment. To get an idea of its size, here it is with all its legs fully elongated, standing next to a couch:  It is able to stand straight up on its own which is a good sign. Also, as you can see, it is more than large enough to be able to carry our desired payloads to achieve the goals of the project, so we're pretty excited about that. Lastly, we wanted to try something fun: our project mentors already know this, but back when we were in our third year of engineering, we actually did a similar project for our MTE 380 - Mechatronics Engineering Design Workshop course. It was a much smaller, scaled-down version of what we are doing now, with less features and a different objective, but the underlying design is similar. So, here it is, our smaller hexapod robot riding the back of our current robot: We're happy with the progress we've made thus far. Now, we plan to begin the electrical side of the robot: get all the parts and components together, integrate them into chassis, and start wiring and connecting things up. We'll provide an update next week, as well as every subsequent week, until the completion of our project. Thanks for reading!
Since last week, we've been well underway in the building of our prototype. We're hoping to share a photo in the next few days of what all the mechanical components look like when put together. We almost have all of our 3D printed parts for the base of the prototype, along with components for the legs, which alone cost $200. Our goal at this point is to finish the mechanical construction of our project in the next week or two, and then begin integrating it with the electrical components.
Speaking of the electrical portion, we noticed that for the connectors, we could not find any pre-crimped wires from DigiKey. This led us to having to make a decision: do we buy expensive pre-made cables, or do we attempt to crimp the wires ourselves? Perhaps if we were in-person, we would've attempted to do this ourselves and save money, but due to the current circumstances, we decided to just buy the cables pre-made. Although this costs us more money, it is easier for us and gives us peace of mind knowing we would already have them properly made. However, with this method, the only thing we have to do ourselves is to splice the wires into a daisy chain. And with our current electronics knowledge and abilities, we should have no issues in getting this to work. 2/5/2021 0 Comments Let the Building BeginBuilding is well underway, as we have received most of the 3D printed parts for the assembly. For the printing, we went with a company in Toronto called Velto 3D, using ABS+ material. The main components of our robot are the chassis or the body, the six legs, and the platform for the payload. The legs are split into three sections: the outer leg, the middle leg, and the inner leg. With each component comes various accessories such as fasteners, bolts, and washers, to connect everything together. Here's a sneak peek of one of our connectors: 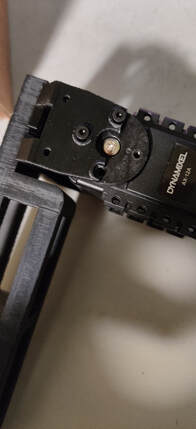 Now, what's building it for the first time without running into any issues? Yeah, we don't know either. As you can see in the image above, the printed connector snapped between two sections of a leg. This prompted us to slightly redesign the middle link for each leg of the assembly. Once we finished this, we reordered these parts and are awaiting their arrival. For now, we'll continue building up the robot and seeing if we need to redesign anything else.
1/29/2021 0 Comments Getting What You Paid For?A notification pops up in our team's group chat. Ah! The motors and its accessories have arrived! We all hop in on a call and the member who bought them all (yes, we split the cost) starts streaming from his camera. We take a look at the glorious box of 18 motors we paid $1000+ for, and its exactly what we expected. A set of top-notch, high quality servo motors for our hexapod robot. All is well, until we get to the accessory pack.
And there we were, staring silently and perplexed at the singular washer that came with the 18 motors. We thought, "there must be another plastic, did you check everything?" But yes, they did in fact only send us one washer even though we were supposed to get one for each motor. So, we sighed a great sigh, and sent an email to our supplier that they needed to send more. A few days later, we received the rest of the washers and could finally begin initial construction. |
Search by typing & pressing enter
